

Analog Securtiy Camera Into Hdmi?
Surely y'all've seen yourself on a monitor when walking into Walmart or checking out at Target. These are chosen Public View Monitors, and they tin exist a corking add-on to your business'south surveillance system. It used to be pretty difficult to connect your security cameras to an external monitor similar this. But not anymore! We're about to brand your life much easier.
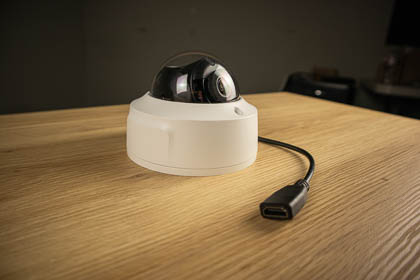
Introducing our new vandal dome security cameras with HDMI output connections! These new cameras will simplify your life by allowing you to gear up an external monitor for your security camera in only ii steps. Connect your photographic camera to power, connect your camera to an HDMI brandish, and bask instant live video from your security camera on your external monitor.
How to Connect a Security Camera to an External Monitor
Connecting your security camera to an HDMI output can greatly increase your business's security. Showing your customers exactly what your security photographic camera sees reminds would-exist criminals that you're recording their every move. Simply how do you connect your security photographic camera to ane of these monitors?
If y'all have a regular security camera, the process can be a bit convoluted. First, you can connect your camera to an NVR, then connect the NVR to the monitor. However, this leads to a pretty big security business, as y'all don't really want your NVR to exist publicly accessible.
Other options include using some kind of converter or decoder to turn your Cat5 Ethernet connection into an HDMI output. Only you're adding more pieces to your organization, which will have more troubleshooting, more fourth dimension, and more than effort than required.
But all of that is in the past, because now we're bringing you a security camera unlike any other. Our HDMI security cameras requite you two outputs: a cat5 Ethernet output and an HDMI output. Y'all tin can run video signals through the HDMI cable directly to an external monitor. At the same fourth dimension, you tin can run your network data and power through a separate Ethernet cablevision to your PoE switch, your NVR, your router, wherever y'all need to take information technology.
In this one camera, we've taken a procedure that used to have a few hours and narrowed information technology down to seconds. This camera really tin can pay for itself when y'all think about all the time and resources you lot're going to be saving.
Our Two HDMI Security Photographic camera Models: 1080p and 4K
Nosotros have 2 models in our HDMI series. A 4K vandal dome and a 1080p vandal dome. Whichever camera y'all get is going to depend on your own needs and preferences.
If the monitor you're going to be connecting your camera to is 4K, then this 4k camera will allow you lot take advantage of each and every pixel at your disposal. This is definitely the photographic camera you desire if loftier definition is a priority for you.
Even so, if smoothen video is a higher priority, then you lot'll want to take a await at the 1080p version. It definitely doesn't come up close to the high quality of the 4K version, just it does shoot video at 60 frames per 2nd. The 4K version only shoots at xx frames per second.
For some context, the human eye perceives move at just under 24 frames per 2d. Then the 4K photographic camera volition appear a fleck choppy, while the 1080p camera volition appear smooth as butter.
Check out the images and videos below to get a better idea of the differences betwixt these two cameras.
1080p HDMI Security Camera
4K HDMI Security Camera
So you have to cull betwixt a loftier resolution and a high frame rate. Only besides that, these two cameras are basically identical. They are not weatherproof, then you'll want to keep these cameras within. Yet, they are both IK10 vandal proof. Now, I highly doubtfulness someone's going to come along and try to smash this, since they'll run across themselves doing it on your monitor. But just in case someone wants to try, they won't be able to.
They accept a 2.8mm stock-still lens with a broad field of view, and then yous can capture a pretty wide area with one camera. The 1080p version does have a slightly wider field of view at 108°, compared to the 4K's 103°. Only information technology'due south actually not that noticeable of a difference. They have an IR range of about 98', which is really incredible for an indoor camera.
And of form, as a part of our H-Serial, you can savor remote viewing from your mobile phone or PC, instant plug and play video with all H-Series recorders, and it'southward ONVIF compatible for utilise with a third political party recorder.
Unboxing The HDMI Security Cameras

- The HDMI Vandal Dome Security Photographic camera
- Your hex wrench for disassembling the vandal dome
- A handy textile lens cleaner
- An adapter for hard wiring DC power
- Your mounting hardware
- A carve up pigtail with audio, alarm, and DC power adapter connections
- A micro-HDMI to full HDMI adapter
- Your drill template, manual, and software CD
This camera does come with a few accessories that you're probably not used to seeing with other vandal dome cameras. Beginning, you'll observe that the connection pigtail comes as a separate piece. With nigh security cameras, this pigtail comes pre-installed; however, most of the connections for this photographic camera can be found embedded within the camera'south trunk underneath the dome. This means yous don't actually need to use the pigtail, unless you need audio, alarm, or 12v DC cables.
Also included in your box, you'll find an HDMI adapter. The camera itself has a micro-HDMI connection. So all you need to do is plug the male end of the adapter into your camera, and you tin can connect a full HDMI cable to the female end.
Now that you know everything your photographic camera comes with, let'southward take a look under the dome to run into how this photographic camera works.
Under the Dome: Setting Upwardly an External Monitor With Your Security Camera
When you open up your dome, you'll see that this camera is very clean and organized on the within. All of your connections are clearly labeled and piece of cake to access. Here are some pictures of this camera to assist y'all navigate the connection interfaces. (Click the closeup images to view their total sizes.)

The Front View
When you expect at the front of the photographic camera, you'll see three connections. On the far left is the RJ45 port for your Ethernet cable. This is where you lot will connect your camera to your network. Y'all tin can too use Ethernet to run power to your camera if you're using a Powever over Ethernet (PoE) switch.
In the middle, you'll observe a 12v DC connection. If yous're non using PoE, yous'll need to supply power to your camera with 12v DC. There are two ways of doing this. If you prefer to hardwire your camera, you tin wire your positive and ground wires into the modest adapter that came included in your box, and plug that adapter in hither.
Finally, on the far right, y'all'll run across the Micro-HDMI connection. Here you'll connect the HDMI adapter included in your box.
The Back View
On the backside of the camera, you'll notice your reset button and your MicroSD carte du jour slot. If you don't plan on calculation this photographic camera to an NVR, y'all can insert a MicroSD card of up to 128GB to record events straight to the photographic camera.
The Side View
Hither you lot'll notice a connection labeled "Audio & Alarm." This is where you'll connect your pigtail, should y'all choose to use the additional connections that it offers. You'll notice there'southward too a channel congenital into the dome to feed the cable through, just to keep everything make clean and organized underneath your dome.
Gear up Upward Your Security Camera and Your External Monitor
At present it's fourth dimension to see how easy information technology really is to fix an external monitor with your security camera. It's so easy that you can achieve this in two uncomplicated steps: power your camera and connect your monitor.
Step One: Power Your Camera
There are 3 ways to power your camera. Our recommendation is to employ Ability over Ethernet, or PoE. If you're using one of our NVRs, there will be a PoE switch in the back. Simply plug your camera into your NVR and you're good to go. If you lot're using this as a standalone camera, or if connecting it to your NVR is not going to work for you, you can always wait into one of our IPCamPower PoE switches. These switches were designed specifically for IP cameras.
The best affair about PoE is that information technology connects your photographic camera to power and to your network with i cable run. But if you're not planning on using PoE, you can still power your photographic camera with a 12V DC ability supply. At that place are two ways to accomplish this.
First, you can connect a premade single unit power supply using the pigtail. The pigtail already has the connector installed, so all you have to do is plug it in and information technology'southward proficient to go.
You tin also hardwire your camera to a 12v DC power supply using the included adapter. Wire your power supply into the adapter's terminals and then insert the adapter into the 12V DC connection on the photographic camera.
Please note that if you connect your camera to power using ane of the 12V DC options, you will still need to run an Ethernet cablevision if you wish to connect your camera to your network. However, this pace is not required for your camera to work with an external monitor. Without a network connection, you tin can still send video signals to your external monitor via an HDMI cable, but you lot will not be able to admission the live feed, configurations, and other functions via the camera'due south interface.
Step Two: Connect Your External Monitor
Now that your camera is booted upwards, the merely thing left is to run the video signals to your external monitor. To exercise this, but connect your camera's HDMI adapter and run an HDMI cable from the adapter to your display. That'south all in that location is to information technology. You tin can now enjoy instant live video from your security photographic camera directly on your external monitor.
Adjust Your Settings
At present that everything is up and running, you lot're probably going to want to adapt a few of the settings to fit your preferences. From the web interface, you'll be able to suit the image quality, change the recording settings, ready all your basic and smart events, configure your camera's network settings, initiate your MicroSD carte, and and so much more. I'm not going to go into everything this camera can practise, since it's the aforementioned interface you're used to with all of our H-Serial cameras.
I do, notwithstanding, want to describe your attention to 1 setting in item: the Wide Dynamic Range (WDR).
Broad Dynamic Range describes a photographic camera's power to residue out uneven lighting. If you point a security camera at a very bright surface area, then other areas of the prototype may announced very dark. WDR darkens the bright areas and brightens the dark areas, giving you a much better and more even moving-picture show. The WDR of our HDMI cameras is rated at 120dB, which is just fancy talk for "actually good."
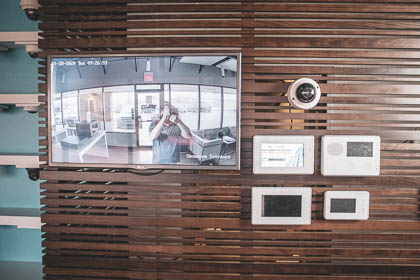
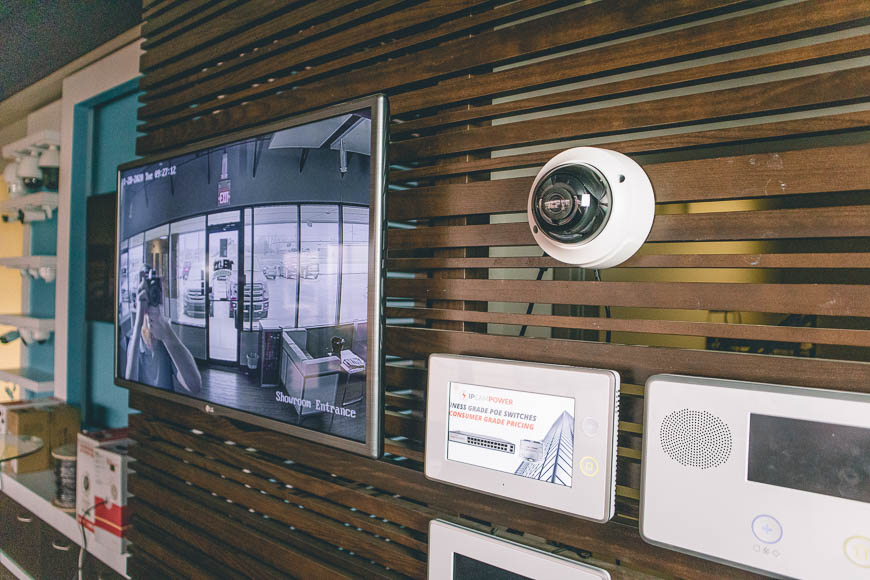
This feature can come in handy here, since most Public View Monitors are gear up at the forepart of a store or building. Accept our PVM, for case, which we have prepare up in our showroom. We installed this HDMI camera and then that the offset thing a customer sees when they walk into our building is themselves, and then they know that they're being recorded and they shouldn't steal any of our stuff. The problem with this is that our camera is pointed directly toward our archway, which consists of wall-to-wall windows. And so you tin can clearly encounter outside of our building, which is very bright and washed out. But yous tin't really encounter within the building, because it'southward way too dark in comparison.
Enter the WDR setting! Check out the images below to run across just how much of a difference it made turning our camera's WDR on. You lot can now clearly encounter what's going on in our showroom.
The WDR setting is found in the camera's web interface under CONFIGURATION > IMAGE > Brandish SETTINGS > BACKLIGHT SETTINGS. You lot tin turn the setting on and off, set up information technology to auto, and adjust the Wide Dynamic Level. Since our monitor up front was a bit dark, we turned our Wyde Dynamic Level upward to around 70. On the web interface, it looked a little as well vivid, but on the monitor it looked perfect. And then play effectually with these settings and figure out what works all-time for you.
Do keep in mind that the 1080P photographic camera cannot access the Wide Dynamic Range feature while shooting video at 60FPS. In club to utilize WDR, you will need to turn the frame charge per unit down to 30FPS. For the 4K camera, you lot can proceed the frame charge per unit at its 20FPS max and still use the WDR setting.
Using the Pigtail
For most applications of this camera, yous won't need to apply the external pigtail. Notwithstanding, if you wish to connect alarm or audio cables, you will need to employ this boosted cable. It's every bit elementary as plugging it into the "Sound & Alarm" connection under your camera's dome. In our review video above, we added a Un-Pre-Amplified microphone to our HDMI camera. For an in depth tutorial on connection a microphone to a security camera or NVR, click here to read our blog post.
In that location are a few unlike types of surveillance mics, but we chose to use an united nations-pre-amplified microhpone because it'southward the simplest setup. These microphones actually receive power from the camera itself, so we don't have to run extra cables to an external power supply. The catch to using this mic is that it can only be used on IP security cameras and on cameras that have a mic-level input. Fortunately for us, these HDMI cameras fulfill both requirements. Bank check out the video below to see this microphone in action.
Terminal Thoughts: Is This Camera Right for Y'all?
Here's the bottom line. Practise you need to connect an external monitor to your security photographic camera for any reason? If the answer is no, then I'm actually surprised you made it this far. You can still accept advantage of this camera's incredible frame charge per unit, organized and pigtail-less connectivity setup, and useful WDR settings. But at the stop of the day, you don't really need to spend money on this camera. There's probably another camera that would better suit your needs.
Even so, if you do need to connect your security photographic camera to an external monitor, and then this camera is a no-brainer. Without this camera, you could be spending hours trying to get your camera's video onto an external monitor. Why would yous spend the same amount of money or more on a standard security camera simply for information technology to accept way more time and energy to fix? You wouldn't.
These security cameras will change your life. Yous'll spend far less time setting upwardly public view monitors and far more than time doing whatever it is you do when you're non installing public view monitors. Check out some more sample footage below, and when you're ready you can use the links at the lesser of this post to buy your HDMI security camera today.
Source: https://www.nellyssecurity.com/blog/articles/video-surveillance/hdmi-security-cameras-simple-external-display
Posted by: wrightequill.blogspot.com
0 Response to "Analog Securtiy Camera Into Hdmi?"
Post a Comment